Quick start guides for Office 2016 are now available!
All Microsoft Office installations will be updated in the coming months to the new version of Microsoft Office.
Home → How-To Guides for Users → Printer Friendly Version
Use iCloud to back up your iOS devices for the following:
Keep in mind that in order to use this feature, you must have an Apple ID synced to your device, as this is the key to tying your data to an account for easy retrieval. If you need any assistance in setting one up, please contact us at helpdesk@ette.biz.
If you're using iCloud, it can automatically back up your content. Use these steps to turn on iCloud Backup:

After you turn on iCloud Backup, iCloud will back up your content automatically. You can return to this screen to see when the last back up happened.
If you need additional iCloud Storage Space, purchase it using these instructions.
Restoring an Account Using Your iCloud onto a New Device
Turn on your iOS device.
From the apps Apps & Data screen, tap Restore from iCloud Backup, then sign in to iCloud.
Proceed to “Choose backup,” then choose from a list of available backups in iCloud.
After using an iCloud backup to restore or set up a device:
Your settings and accounts are restored from the iCloud backup you chose. Your device will restart and then begin to download your purchased music, movies, TV shows, apps, books, photos, and other content. If your device can’t download the version of an app that was backed up, it downloads the latest version.
Your purchased content is automatically downloaded from the iTunes Store, App Store, or iBooks Store based on Availability of iTunes redownloads. Previous purchases may be unavailable if they have been refunded or are no longer available in the store.
You may be asked to enter passwords for iTunes Store, App Store, and iBooks Store accounts to restore purchased items.
Progress bars appear below Home screen icons for apps being downloaded.
To make an app a priority for downloading, tap its icon.
To check if the information on your device is fully restored, go to Settings > iCloud > Storage (Settings > iCloud > Storage & Backup).
When you sign up for iCloud, you automatically get 5 GB of free storage for Mail, Backup, iCloud Photo Library data, and iCloud Drive. Your purchased music, movies, apps, books, TV shows, and shared albums don’t count against that free storage. If you need more iCloud storage, you have two options:
You can increase the amount of storage by selecting a new plan from your iPhone, iPad, iPod, Mac, or PC (for example, a 200 GB plan to replace a 20 GB plan). Your existing storage plan will be canceled, and you'll be charged the prorated cost for the upgrade (the cost of the higher-tier plan minus the prorated cost of the previous plan). Your plan is upgraded immediately, and the new monthly payment date is updated to reflect the purchase date for the new plan. You'll be notified by email each month about 7 days before the monthly payment for your storage plan is due. Your storage upgrade is billed every month unless you cancel by downgrading your storage plan.
iOS:
These days, mobile devices like smartphones and tablets store an incredible amount of information, much of it sensitive and personal. Often users set up a simple four pin code to protect this information. However, this security feature, although better than no protection at all, is still relatively weak.
Apple iOS devices
Configuring an iOS device to require a complex password to access it, is rather simple.

If you need to enable Touch ID, follow this article from Apple.
Two-step verification is an additional security feature for your Apple ID that's designed to prevent anyone from accessing or using your Apple account, even if they know your password.
It requires you to verify your identity using one of your devices or another approved method before you can:
Your Apple ID is the key to many things you do with Apple. It's important that only you have the ability to access your account details, update your password, access the data you store and keep up to date with iCloud, or make iTunes and App Store purchases with your account. Two-step verification is a feature you can use to keep your Apple ID and personal information as secure as possible.
When you set up two-step verification, you register one or more trusted devices. A trusted device is a device you control that can receive 4-digit verification codes using either SMS or Find My iPhone. You're required to provide at least one SMS capable phone number.
Then, any time you sign in to manage your Apple ID at My Apple ID, sign in to iCloud, or make an iTunes, iBooks, or App Store purchase from a new device, you'll need to verify your identity by entering both your password and a 4-digit verification code, as shown below.
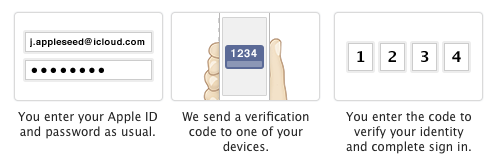
After you sign in, you can securely access your account or make purchases as usual. Without both your password and the verification code, access to your account will be denied.
You will also get a 14-character Recovery Key to print and keep in a safe place. Use your Recovery Key to regain access to your account if you ever lose access to your trusted devices or forget your password.
With two-step verification, you don't need to create or remember any security questions. Your identity is verified exclusively using your password, verification codes sent to your trusted devices, and your Recovery Key.
You're required to verify at least one SMS-capable phone number for your account. You should consider verifying all SMS-capable phone numbers that you normally use with your iPhone or another mobile phone. You should also consider verifying an SMS-capable phone number used by someone close to you, such as a spouse or other family member. You can use this number if you're temporarily without access to your own devices.
Note: You can't use landline or web-based (VOIP) phone services for two-step verification.
Find My iPhone notifications can be used to receive verification codes on any iOS device with Find My iPhone turned on. Learn how to set up Find My iPhone.
Keep your Recovery Key in a secure place in your home, office, or other location. You should consider printing more than one copy, so that you can keep your key in more than one place. Your key will be easier to find if you ever need it, and you'll have a spare copy if one is ever lost or destroyed. You shouldn't store your Recovery Key on your device or computer, because that could give an unauthorized user instant access to your key.
If you ever need a new Recovery Key, you can create one at My Apple ID:
After you create a new key, your old Recovery Key is no longer usable.
You can generate an app-specific password from your account page at My Apple ID and enter it into the password field of the app that you want to sign in to. This will allow you to sign in securely even if the app you’re using doesn’t support entering verification codes. For example, you might use an app-specific password to sign in to iCloud using a third party email, address book, or calendar app.
Generate an app-specific password:
Two-step verification simplifies and strengthens the security of your Apple ID. After you turn it on, there's no way for anyone to access and manage your account other than by using your password, verification codes sent to your trusted devices, or your Recovery Key. Only you can reset your password, manage your trusted devices, or create a new Recovery Key. Apple Support can help you with other aspects of your service, but they aren't able to update or recover these three things for you. Therefore, when you use two-step verification, you are entirely responsible for:
If you lose access to two of these three items at the same time, you could be locked out of your Apple ID permanently.
You can sign in to My Apple ID and create a new Recovery Key using your Apple ID password and one of your trusted devices.
You can reset it at My Apple ID using your Recovery Key and one of your trusted devices.
Apple Support can't reset your password for you. To reset your password, you must have your Recovery Key and access to at least one of your trusted devices.
If you no longer have access to one of your devices, go to My Apple ID as soon as possible to remove that device from your list of trusted devices. That device can then no longer be used to help verify your identity.
If you can't access any of your trusted devices, you can still access your account using your password and Recovery Key. You should then verify a new trusted device as soon as possible.
As a basic security measure, Apple doesn't allow setup of two-step verification to proceed if significant changes were recently made to your Apple ID account information. Significant changes can include a password reset or new security questions. This waiting period helps Apple make sure that you are the only person accessing or modifying your account. While you are in this waiting period, you can continue using your account as usual with all Apple services and stores.
Apple will send an email to all the addresses you have on file notifying you of the waiting period and encouraging you to contact Apple Support if you think that someone else has unauthorized access to your account. You can set up two-step verification after the date listed on your Apple ID account page and in the email that you receive.
When your waiting period is over, you have 30 days to complete setup of two-step verification. If you attempt to complete setup after 30 days have passed, or you made significant changes to your account during that time, another waiting period may be triggered.
Go to the App Store on your iPad.
Tap the Star icon (Top Charts) at the bottom of the page.

Scroll down until you see the Apple ID in the lower left.

Tap on the ID.
Tap Sign Out on the

Sign in with another ID.
With the ever-looming possibility of loosing data due to theft, data corruption, and various other threats of the day, its incredibly important to discuss backing up data on all devices regularly. Backing up the data on your iPhone is no exception. It cannot only save you should unexpected events occur, but it can also aid in assisting you in restoring your data onto a second device.
This article will explain how to add various attributes to your iCloud backup option so that all desired data can be saved safety to your iCloud account on a nightly basis. But first, a few basics:
When you sign up for iCloud, you automatically get 5 GB of free storage. This can quickly get eaten up by music and picture files, so if you need to purchase more storage, you may find more information on how to do so here.
What is Automatically backed up by Default?
iCloud automatically backs up the information on your devices—iPhone, iPad, and iPod touch—over Wi-Fi every day when the device is turned on, locked, and connected to a power source. When your iOS device information is backed up in iCloud, you can easily set up a new device or restore information on one you already have.
Here’s what iCloud backs up:
Purchase history for music, movies, TV shows, apps, and books
Your iCloud backup includes information about the content you purchased, butnot the purchased content itself. When you restore from an iCloud backup, your purchased content is automatically downloaded from the iTunes Store, App Store, or iBooks Store. Some types of content aren’t downloaded automatically in all countries, and previous purchases may be unavailable if they have been refunded or are no longer available in the store. For more information, see the Apple Support article Availability of iTunes redownloads. Some types of content aren’t available in all countries. For more information, see the Apple Support article What can I buy from the iTunes Store in my country?.
Photos and videos on your iOS devices
However, if you turn on iCloud Photo Library on your iOS device (iOS 8.1 or later) or Mac (OS X v10.10.3 or later), your photos and videos are already stored in iCloud, so they aren’t included in your iCloud backup.
Device settings
App data
Home screen and app organization
iMessage, text (SMS), and MMS messages (requires the SIM card that was in use during backup)
Ringtones
Visual Voicemail password (requires the SIM card that was in use during backup)
Health data
HomeKit configuration
Many apps automatically back up to iCloud after you install them. But some applications take up more data than others, or may be just as important as those that are saved automatically. Therefore, you can change which apps back up to iCloud and remove existing backups of that app's data from your storage.
Use these steps on your iPhone, iPad, or iPod touch:
When you're asked to confirm, choose Turn Off & Delete to turn off the option of Backing up for that app. This will remove all of its data from iCloud.
** Please note that once you turn off the backing up of that application and confirm it, all data will be wiped from previous backups. You will not have the ability to go back through your iCloud storage to find that data afterward.
You may also select the option to turn off all backups, although this is not recommended, as you will loose all ability to restore your device in the event of theft, damage or corruption. Choose carefully when considering any changes to this area.
iOS software updates introduce new features that let you do even more with your iPhone, iPad, or iPod touch. Be sure to keep your devices up to date so that you don't miss out on the latest features.
Back up your device to iCloud.

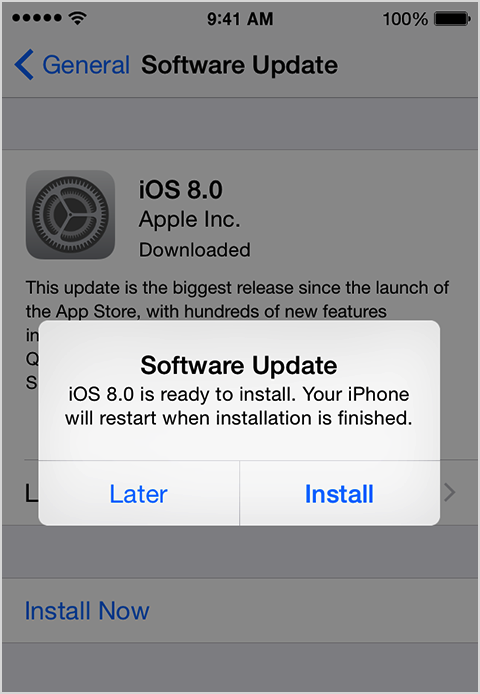
If you have any questions or are running into problems updating your device(s), please reach out to helpdesk@ette.biz
OpenVPN is a tool that allows users to securely connect to their organization's network when they are not at the office. When users connect to unsecured internet resources, such as those found in cafes or when connected to the LTE or 4G connections that are available in cities, this is not providing a secure connection to safeguard corporate information. OpenVPN helps to provide that security, while providing users access valuable corporate resources like their network shares, servers, and other network-based articles.
There is one very important key to using OpenVPN: Reliable Internet. If the connection to the Internet is not reliable, OpenVPN will not work in an optimal manner. So please keep this in mind before deciding whether to use OpenVPN, as not all city or rural locations will have the reliable Internet you may require.
Before users can utilize this tool, they must be set up with an account and have the application installed onto their system. These require Administrative privileges. For help with both of these requirements, please contact us at helpdesk@ette.biz and we will help set one up for you.
Once the account and application is in place, please see the instructions below for using the application.
How to use OpenVPN
Please be aware that if you are working from the office, you must disconnect from OpenVPN in order for your system to work normally. Otherwise you may experience slowness while working with the server and/or accessing your shared drives. If you are currently connected to OpenVPN, please see the instructions for "How to Manually Disconnecting from OpenVPN". If you are not connected, please jump to "How to Manually Connect to OpenVPN".
How to Manually Disconnect OpenVPN:
Find OpenVPN tray icon, right click on it and select Disconnect vpn.(domain name).com **note: the ending may be .org, .com, or other variants. This is dependent on your organization.


Once OpenVPN is disconnected, you will see a gray X.
![]()
Connect to OpenVPN:
If you are not in the office and wish to connect to corporate resources, you should always make sure that OpenVPN is connected before attempting to access those items. If you are not connected, please see the following section, "How to Manually Connect to OpenVPN."
How to Manually Connect to OpenVPN
Locate the the OpenVPN icon in your system's tray, located at the lower-right hand corner of your desktop. Right-click on it and select Connect to vpn.(domain name).com

The connection should establish and the X on the OpenVPN icon will change to a green check mark.
Once connected, you should be able to see your network shares unobstructed. However, please note that your network shares may still show a red X next to them. If this occurs, please double-click on them as if you were attempting access to them. This should force the connection to be established and it should show the drive's contents.
Additional Notes to Remember
Please be aware that whenever you move from various networks, you may need to reboot your system and/or disconnect from OpenVPN then reconnect in order to force a fresh connection to your corporate resources. An example of such instances would be from a cafe's public internet to your home network.
If you still come across difficulties after trying all of these tips, please feel free to contact helpdesk@ette.biz to request additional troubleshooting.
Quick start guides for Office 2016 are now available!
All Microsoft Office installations will be updated in the coming months to the new version of Microsoft Office.
If your organization is subscribed to the Microsoft 365 E3 licensing plan, each employee may install Microsoft Office 365 Professional Plus on up to five machines the employee uses for work. This may include a personal and/or home machine(s). To install Microsoft Office, please do the following:


All done!

Now you're ready to start using Office.
On your iPhone, go to the App Store.
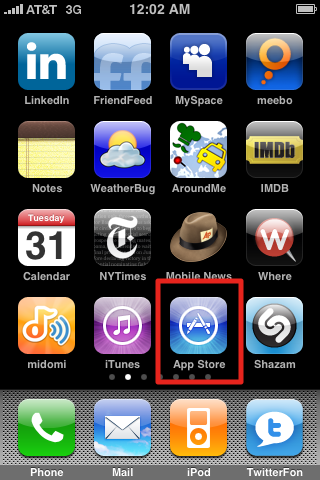
On the Search option, enter Office 365 and search.
Native versions of the Microsoft Office suite are available for

For any questions, please feel free to contact us at helpdesk@ette.biz
What is Clutter?
Clutter helps you move low priority messages out of your Inbox so that you can easily scan for important messages. Clutter analyzes your emails, and based on your past behavior, determines the messages that you’re most likely to ignore. It then moves those messages to a folder called Clutter so that you can review them later.
How do I disable Clutter?

Where can I find out more about Clutter?
Please visit this page.
Office 365 E3 licensees have the added feature of sending encrypted emails to any users through their Web portal or through their Outlook profile. This guide is to assist you with how to implement this feature so that you can be sure the emails are truly encrypted before sending sensitive data through cyberspace. This will also show you an example of an encrypted email and how it will look to the recipient when this feature is implemented correctly.
This feature is incredibly simple to implement. All you have to enter is @encrypt in the subject line.

That's it!
Please keep in mind that the @ symbol is very important to this method being implemented. The message will not encrypt if the @ symbol is not there.
How an Encrypted Email will Look to the Recipient
When an email is sent out to a user using the Microsoft Office 365 Encrypted Message feature, the email is encrypted prior to it leaving the sender's Outlook profile or Web portal. The encryption occurs on the back end, meaning that the sender does not need to do anything once he/she selects the "encrypt" option.
So what will the recipient see when they receive the email?
When an external recipient receives an encrypted message from your organization, they will see an encrypted attachment and an instruction to view the encrypted message. The email will appear as follows.

Unlike other emails, which do not require your validation prior to viewing, Microsoft 365-based encrypted emails require authentication prior to being decrypted. This authentication uses your Microsoft 365 sign-in credentials, and as such, validates that you are indeed who you say you are.
When this occurs using the Web portal of Office 365, this validation step will prompt the opening of a new tab within your browser, which will utilize the secure protocols of your browser to download the contents and decrypt the message.
If you wish to reply to the sender, then you may
If you have any questions about how this feature works, please don't hesitate to contact us.
A shared mailbox is a mailbox that multiple users can use to read and send email messages. Shared mailboxes can also be used to provide a common calendar, allowing multiple users to schedule and view vacation time or work shifts.
Why set up a shared mailbox?
Shared mailboxes make it easy for a specific group of people to monitor and send email from a common account, like public email addresses (for example, info@contoso.com or contact@contoso.com). When a person in the group replies to a message sent to the shared mailbox, the email appears to be from the shared mailbox, not from the individual user.
Shared mailboxes are a great way to handle customer email queries because several people in your organization can share the responsibility of monitoring the mailbox and responding to queries. Your customer queries get quicker answers and related emails are stored in one mailbox.
A shared mailbox doesn't have its own user name and password. You can't log into a shared mailbox directly using Outlook, Outlook Web App, Exchange ActiveSync, Exchange Web Services (EWS), or any other Exchange protocol. You must first be granted permissions to the shared mailbox, and then you access it using Outlook or Outlook Web App. You don’t need to assign licenses to shared mailboxes, except when they are over their storage quota of 50 gigabytes (GB). If your shared mailbox goes over its quota of 50GB and you don’t assign it a license, after one month the shared mailbox will be locked. You can avoid having to assign the license by using archiving to avoid going over your quota.
Shared mailboxes can be created with the following permissions.
In contrast, the standard user mailbox is a requirement for all users who are going to be utilizing email within an organization. These mailboxes require a license and a user name/password. Unlike shared mailboxes, these mailboxes are solely for emails that the assigned user receives or sends. The vast majority of organizations will provide individual mailboxes for its users, and only a few shared mailboxes for designated purposes (such as HR, Marketing, etc.).
Please feel free to contact us at helpdesk@ette.biz for additional questions.
Blackberry Setup
For Blackberry setup, please contact ETTE at helpdesk@ette.biz.
iPhone Setup
Tap Settings > Accounts & Passwords > Add account.
In the Add Account page, tap Exchange.

Enter your full email address, for

By default, Mail, Contacts, and Calendar information are synchronized. Tap Save.
If you're prompted to create a passcode, tap Continue and type a numeric passcode. If you're prompted and don't set up a passcode, you can't view this account on your device. You can also set up a passcode later in your settings.
Android Setup
Manual set up
Tap Settings > Accounts > Add account > Email.

Enter your full email address, for example <someone>@outlook.com, and your password, and then tap Manual setup.

To set up an Outlook.com account, select Microsoft Exchange ActiveSync.
Accept the defaults on the Exchange server settings page, and tap Next. If your device still can't connect, update the following account information.
Domain\Username If your full email address is not in the box, delete what's there and type your full email address, for example, <someone>@outlook.com. If Domain and Username are separate text boxes on your device, leave the Domain box empty, and type your full email address in the Username box.
Password Use the password that you use to access your account.
Exchange Server name Use outlook.office365.com for the server name.
Make sure the Use secure connection (SSL) checkbox is checked, then tap Next.

If you receive an activation request, select OK if you want to continue with the setup.
Change or accept the default sync settings, and then tap Next.
Give the account a name, and then tap Done.
If you synced your calendar and contacts in step 6 you can go to those apps on your phone to view any items that might be there. If you synced tasks as well, you should see them in the calendar app on your device. However, please note that it might take 10-15 minutes for everything to sync.
As soon as your phone verifies the server settings, the Account Options screen displays. The options available depend on the version of Android on your device. The options may include the following:
Select Next and then type a name for this account and the name you want
Gmail App Set up
You can also add your exchange account using the Gmail Application on your Android Phone.
1. Got to Settings> Account> Add account> Exchange (Gmail Icon)

2. Type your email and tap Next

3. Type your password and tap on Next

4. Scroll down

The documents and folders you store in OneDrive for Business are private until you decide to share them. Similarly, in a team site library, you may want to share specific documents or folders with people who don't otherwise have access to the site. When you share documents and folders, you can decide whether to let people edit or just view them.
Note You may also be able


Guest links:
Note If you see only a restricted link option instead of the options shown here, sharing links may be disabled or you may not have permission to use them. For information about how to enable sharing, see Video: Share a site without access request.
If you choose a no sign-in required

Notes
Go to OneDrive for Business or the site library that has the document or folder you want to share.
Right-click the file you want to share, and then select Share.

In the Share dialog box on the Invite people tab, type names or email addresses of people you want to share the document or folder with.

Select a permission setting, such as Can edit.

If you want, type a message to be included with an email that’s sent to all invitees. The email includes a link to the shared document.
If you don't want to send an email, uncheck Send an email invitation.
Click Share.
For recommendations on where to store files in Office 365 and how to set things up, see Set up Office 365 file storage and sharing.
Create a folder and place documents in that folder as you create them

Type a name for the

Click Create.
Add members to the group.
In your group, near the top of the page, click Files to go to the group OneDrive.

Drag files onto the page or click Upload.
Create a folder and place documents in that folder as you create them
To create a folder, click New > Folder. You can share the folder with people as you create it.
If you didn't already share the folder while creating it, share the folder by inviting people.
Upload or drag files to the folder.
In the Share dialog box, click Shared with.

If you're sharing with more people than whose names will fit on the card, select the more link at the end of the list of names. You can scroll the list to see all names.
Tips If the library you're working in has a Sharing column, you can select the people icon to open the Share dialog box.

Select the people icon for the document or folder to open the Share dialog box.
On the Shared with

To stop sharing a document with everyone at once, select STOP SHARING

Note The STOP SHARING link that removes all users at once is not available for folders. To quickly stop sharing a folder with many users or groups, try this: Click ADVANCED, use the

Create a “Shared with Everyone” folder (or one with a similar name) and place documents in that folder as you create them. To create a folder, click New > Folder. You can share the folder with people as you create it.

Note You may already have a Shared with Everyone folder that was provisioned for you.
The Share dialog box lets you select “Everyone except external users.” If your organization allows external sharing, sharing with “Everyone” includes external users: people outside of your organization who have previously been invited to share documents as guests, either by you or by others in your organization.
If you have a Shared with Everyone folder that was provisioned for you, everyone gets permission to edit documents that you put in the Shared with Everyone folder, unless you change the permission setting or unless your OneDrive for Business was created before June 2014. If your OneDrive for
Documents you share with everyone don’t appear in their Shared with Me view in OneDrive for Business. Why not? Consider that depending on the size of your organization, there might be hundreds if not thousands of documents that are shared with everyone. Also, you may not want to send a share invitation email to everyone in your organization.
Instead, people can find these documents
You can find any document’s web URL in its document callout.

Copy and paste the URL into an email addressed to specific people you want to notify.
Using their Search box in OneDrive for Business.
In this example, Molly Dempsey searches on the keyword “Court Cases” to find any relevant documents shared with her in her organization.

Welcome to Microsoft Office 365! Your organization is moving to a responsive, cloud-based solution for Microsoft Exchange email, Skype for business communications, and SharePoint for intranet portals.
Post-Migration Steps
Your migration will automatically repoint your Microsoft Outlook 2010 and above to the Office 365 service. You may be prompted to close Outlook and re-open to complete this process.
Outlook Web App Access
Your webmail, known as Outlook Web App, is accessible at http://mail.yourdomain.com. For example, if your website domain is MyBikeStore.com, your webmail is http://mail.MyBikeStore.com.
Setting up Email on your Smart Phone
Your smart phone will need to be setup to access email again. This process involves deleting your existing smart phone organizational email account and then re-adding it. In the subsequent pages, this document explains recreating this account for common smart phones as provided by Microsoft.
Blackberry Setup
For Blackberry setup, please contact ETTE at helpdesk@ette.biz.
iPhone Setup
1. First, delete any existing email accounts for your organization by going to Settings > Mail, Contacts, Calendars
2. Tap Settings > Mail, Contacts, Calendars > Add Account.
3. Tap Microsoft Exchange.
4. You don’t need to type anything in the Domain box. Type the information requested in the Email, Username, and Password boxes. You need to type your full email address in the Email and Username boxes (for example, tony@contoso.com). Please note that if your username differs from your email address, please use the username@yourdomain.com format.
5. Tap Next on the upper-right corner of the screen. Your mail program will try to find the settings it needs to set up your account. Go to step 8 if your mail program finds your settings.
6. Use outlook.office365.com for your server name.
7. In the Server box, enter your server name, and then tap Next.
8. Choose the type of information you want to synchronize between your account and your device, and then touch Save. By default, Mail, Contacts, and Calendar information are synchronized.
Android Setup
1. First, delete any existing email accounts for your organization on your device
2. From the Applications menu, select Email. This application may be named Mail on some versions of Android.
3. Type your full email address, for example tony@contoso.com, and your password, and then select Next.
4. Select Exchange account. This option may be named Exchange ActiveSync on some versions of Android.
5. Enter the following account information and select Next.
5. As soon as your phone verifies the server settings, the Account Options screen displays. The options available depend on the version of Android on your device. The options may include the following:
6. Select Next and then type a name for this account and the name you want displayed when you send e-mail to others. Select Done to complete the email setup and start using your account.
NOTE You may need to wait ten-to-fifteen minutes after you set up your account before you can send or receive e-mail.
After you access a shared Calendar for the first time, the Calendar is added to the Navigation Pane. The next time that you want to view the shared Calendar, you can click it in the Navigation Pane.
If you see an alert message stating that you do not have permission to view their calendar, please contact the calendar's owner to ask them to grant you permissions.
When you might want to work
In Outlook, you have the flexibility to choose whether you want to work online or offline, and you can do so either automatically or manually. If you elected to work offline, but are ready to manually start a send/receive operation, just click Send/Receive > Send/Receive All Folders.
While this setting is incredibly helpful in such scenarios, Outlook does not have the ability to switch between the two modes automatically. Therefore, to assist you with the conversion back to "Online Mode," please follow the below instructions.
Switch from working offline to online
If the status bar at the bottom of your Microsoft Outlook window shows Working Offline, it means Outlook’s disconnected from your mail server. You can’t send or receive email until you reconnect.

The first thing to check is your Internet connection by trying to connect to a website. If your Internet connection is working, try reconnecting to the mail server. Here's how:
Click Send/Receive.
Notice that when Outlook is set to Work Offline, the button is highlighted.

Click Work Offline to return to working online.
After you reconnect to the server, the Work Offline button has a plain background:

Still no luck? Please contact us for additional help.
Connectivity issues can occur in many forms and can provide a variety of flags to alert you to those issues. But some connectivity issues may not provide you with any alerts at all, and may come in the form of slowness. Please review the following steps for basic remediation of simple Internet troubleshooting.
Are these issues just affecting me?
Ask others within your organization if they are experiencing connectivity issues also. If they are, it's likely that there is a organization-wide issue that is occurring, so please don't hesitate to reach out to us at helpdesk@ette.biz or 202-345-1965 so that we can reach our to your Internet Service Provider on your behalf.
However, if your work-mates are not experiencing issues, please confirm whether you receive internet through a physical connection (via an Ethernet cable,) or via Wireless (WiFi) as the following instructions will be specific to the type of connection used.
Wired Connections: Am I physically plugged in?
If you utilize Ethernet cables that are plugged into the back of your computer, please check your system's physical connection to ensure that the connection is sound. To test this, please disconnect from your computer AND from the wall jack by pressing down on the clear knob on the cable (shown in the picture below), then plug the cable back in in both locations. Completing this simple test will force your computer to provide a fresh connection to the internet.

Please note that when plugging it back into the wall or computer, you should hear a "click," which will alert you that the connection is indeed locked in place. If you do not hear the "click" when inserted, lightly pull the cable to see if it comes out. If you can pull the cable out, then the cable may need replacement just to provide you with that sound connection.
Wireless Connections: Is my Wireless adapter switch turned on?
If you are specifically having issues connecting to a wireless network and are working on a laptop, please double-check to make sure that the wireless adapter switch didn't get turned off while you were in transit, or through regular handling. The placement of these physical switches are dependent on the make and model of the laptop, but may be placed on the sides, front, or near the top of the keyboard. In addition to viewing the alert notice on the screen, some laptop manufacturers place lights on the laptop under the name WiFi or using an antenna symbol. If the light is off, that could mean that the adapter is turned off (alert shown on-screen shown below).

(disabled network adapter in Windows 10)
Please take a moment to look around the sides and back of your laptop to ensure that this switch hasn't been tripped. If it has been tripped, turning it back on will automatically begin the connection to a remembered wireless network. If you have never connected to the wireless network, please contact your organization's point of contact for ETTE to determine the wireless network passwords.
Wired and Wireless: Network Internal Connections
If the physical switch is in the correct position, you may confirm that they are enabled internally by clicking on your start button, and following the below prompts.
Control Panel --> Network and Internet -->Network Connections
This will open a page that looks similar to this:

Right-clicking on the adapter of your choice will allow you to provide the option for enabling it. If this requires administrative credentials, this option may not be available to you and you will need to contact a staff admin, or contact ETTE to have this enabled.
Having Slow Internet speeds?
It's one thing to have Internet, but its just as bad if your connection is slow. As with ensuring the connection is sound, please make sure that everyone is not feeling like the internet connection is slow, and go through steps 1-2 before attempting this option.
If slowness is a concern, feel free to conduct a SpeedTest on your machine using the link http://www.speedtest.net/.

Click on "Begin Test" Please do not click on the other links as they are advertisements and not relevant to the test.
The test will be conducted by testing the download and upload speeds on your connection. At the end, the results will be shown in a format as follows.

** Please note that the results generated will be different from organization to organization, and in some cases, may be different if the available bandwidth per user is controlled by executive policy. If you feel that the speed results you have are incorrect, or suspect that they are slower than what you should be receiving, please contact us and provide us with these results. We will work with you to determine whether the results generated meet with your organization's standards.
Should either of these options not address you issue, please reach out to us at helpdesk@ette.biz or 202-345-1965 and we will be happy to assist you with further troubleshooting.
Manual set up
Tap Settings > Accounts > Add account > Email.
Enter your full email address, for example <someone>@outlook.com, and your password, and then tap Manual setup.
To set up an Outlook.com account, select Microsoft Exchange ActiveSync.
Accept the defaults on the Exchange server settings page, and tap Next. If your device still can't connect, update the following account information.
Domain\Username If your full email address is not in the box, delete what's there and type your full email address, for example, <someone>@outlook.com. If Domain and Username are separate text boxes on your device, leave the Domain box empty, and type your full email address in the Username box.
Password Use the password that you use to access your account.
Exchange Server name Use outlook.office365.com for the server name.
Make sure the Use secure connection (SSL) checkbox is checked, then tap Next.
If you receive an activation request, select OK if you want to continue with the setup.
Change or accept the default sync settings, and then tap Next.
Give the account a name, and then tap Done.
If you synced your calendar and contacts in step 6 you can go to those apps on your phone to view any items that might be there. If you synced tasks as well, you should see them in the calendar app on your device. However, please note that it might take 10-15 minutes for everything to sync.
As soon as your phone verifies the server settings, the Account Options screen displays. The options available depend on the version of Android on your device. The options may include the following:
Select Next and then type a name for this account and the name you want